Since I've been a little girl, Good Friday has always been the day when we were dyeing Easter eggs. Although on the Continent you could get all kinds of dyes, my mother preferred to dye our eggs with natural dyes. Around Easter the drugstores would sell different kinds of roots and woods which would transform your eggs into many lovely shades. If you never have dyed your Easter eggs yourself, here is a little instruction. You can't get dyeing roots and woods everywhere (at least not on Arran) but that's no reason to avoid colouring your eggs! There are more simple ingredients you may even have in your cupboard and if not, they are available just around the corner. Dyeing eggs starts with very light coloured, preferably white eggs. In Britain it can be difficult to find white eggs in the shops. Luckily I have quite a few enthusiastic hen keepers living near me. And some of them keep hens which lay white or very pale beige eggs. This year I went for duck's eggs. They're usually white or very light blue. And they're ideal when you work with kids. Their shells are much stronger and won't break easily. And they taste as good as a hen's egg.
 Lovely eggs from Laura's adorable ducks
The next decision you'll have to make is for what colours you'll be going. This year I choose to have red, pink, purple and yellow eggs. But you can easily have violet, blue, green and orange eggs as well. The following ingredients are easy to come by: lilac/purple - purple grape juice, red cabbage, blueberries, reddish purple and violet hues - red wine, red onion skins, yellow - turmeric (kurkuma), green tea, brown - strong coffee, onion skins, pink - beetroot, orange - yellow onion skins, paprika, red - onion skins, some red wines, green - boiled spinach leaves.
For my colour scheme I decided to go for turmeric, beetroot, red cabbage and onion skins. Unfortunately I did not have enough red onion skins (I started a little late to save them) so I had to mix in a few yellow onion skins which made my eggs not go red but a shade of reddish brown. But I think, they're still lovely.
If you would like a pattern on your eggs, you can for example arrange herbs and grasses on top of your egg.

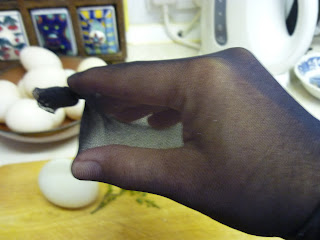
Then grab your decorated egg like this:

and pull the stocking over your hand and seal it tightly with another knot.

I know, I know, you are tempted to use the foot of the stocking. But don't do it! There are usually seams, and often it is tighter woven which might destroy your lovely pattern. Actually, you might even get a bit of a pattern from the knots. If you want to avoid that from happening you would have to ask somebody to tie the stocking closely with a piece of thread or string. You can achieve patterns by wrapping string or cotton thread around your egg. That goes easier if you wet the string before you start wrapping. Make sure it is sitting tightly around your egg and handle it with care when you fix it in your stocking!

You can also work with a resist technique by drawing patterns all over your egg with a wax crayon. The dye will not cover areas you have drawn.

Of course, you can try with different coloured wax crayons but there is not much guarantee that the spared lines will keep the colour of your crayon. They will just be much lighter than the rest of your egg. It's a very subtle pattern that you will achieve. These eggs will not have to be wrapped in stocking. Finally comes the big moment of dyeing. Place your prepared eggs into a suitable pan. Cover with water, add 1 - 2 tsp of vinegar and your dying material. I used the skins of about 5 onions, respectively 2 tbsp of turmeric, three beets or the chopped half of a small red cabbage in a small pan since I was only dyeing two to three eggs at once. With time you will gather more experience.

Now bring your eggs to the boil and then let them simmer for at least 15 minutes. Then check how they look like. If they are too pale, add more dyeing material and let them cook a little longer. You can actually take them out, rinse quickly under cold water (so they will peel better), put them back into the sieved dyeing liquid and let them stand over night to achieve a deeper colouring.

These are some of my onion and kurkuma dyed eggs. From left: Knot pattern on turmeric dyed egg, plants and herbs on an egg dyed with red and yellow onion skin, another turmeric egg, then a string pattern on an onion egg and at last a scribbled pattern. The time you need to do all this? Not more than an hour altogether. I started first thing in the morning and had enough time to spend the rest of Good Friday cleaning up the garden, cutting back shrubs and watch my teenage son cutting the hedges with an electric hedge trimmer... And then - it got very cold and started raining again...


No comments:
Post a Comment